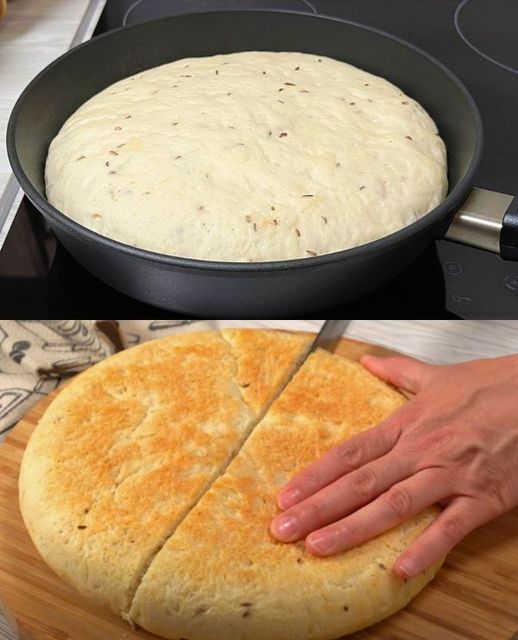
Say goodbye to store-bought bread and hello to homemade goodness! This simple guide will walk you through the process of making delicious bread without the need for an oven. With just a few basic ingredients and a pan, you can enjoy fresh, warm bread straight from your kitchen. Perfect for those who want to experience the joy of bread-making at home, this recipe is easy and satisfying.
Ingredients:
- 400 grams (3 1/4 cups) plain flour
- 220 milliliters (about 1 cup) warm water
- 6 grams (2 teaspoons) instant yeast
- 2 teaspoons sugar
- 1 teaspoon salt
- 1 teaspoon cumin (optional, for flavor)
- Vegetable oil (as needed for greasing)
Preparation Time:
- Total Time: 2 hours 30 minutes (including rising time)
Directions:
- Mixing the Dough:
- Step 1: Begin by mixing the warm water with sugar and instant yeast in a bowl. Stir until the yeast is dissolved and let it sit for a few minutes until it becomes frothy.
- Step 2: Sift the plain flour into the yeast mixture. Add the salt and cumin (if using), and mix well. Knead the ingredients by hand or with a stand mixer until a thick, sticky dough forms.
- Kneading and Rising:
- Step 1: Grease your work surface and hands with oil to prevent the dough from sticking. Knead the dough for about 10 minutes until it becomes smooth and elastic.
- Step 2: Place the dough in a greased bowl, cover it with a towel or plastic wrap, and let it rise in a warm place for about an hour or until it doubles in size.
- Preparing the Pan and Dough:
- Step 1: Grease a large pan with vegetable oil and carefully transfer the risen dough into it.
- Step 2: Spread the dough evenly over the surface of the pan using your fingers. Cover the pan with a towel and let it rest for another 30 minutes.
- Pan-Frying the Bread:
- Step 1: Place the pan on the stove over low heat and cover it with a lid. Allow the bread to fry slowly, ensuring the bottom turns golden brown.
- Step 2: Once the bread comes off the bottom of the pan easily, flip it with the help of a plate or spatula and cook the other side until golden brown as well.
- Serving and Enjoying:
- Step 1: Remove the bread from the pan, let it cool slightly on a wire rack, and slice it as you would regular bread.
- Step 2: Enjoy it plain, with butter, or as an accompaniment to your favorite dish.
Serving Suggestions:
- Serve warm with butter or olive oil for dipping.
- Pair with soups, stews, or salads for a complete meal.
- Use as a base for sandwiches or as a side for breakfast dishes like eggs and bacon.
- Toast lightly and spread with jam or honey for a sweet treat.
Cooking Tips:
- Ensure your water is warm (but not hot) to activate the yeast effectively.
- Kneading the dough well is crucial for developing gluten, which gives the bread its structure.
- Keep the heat low while frying to avoid burning the bread and to cook it evenly.
- You can add herbs, spices, or seeds to the dough for added flavor and texture.
Nutritional Benefits:
- This bread is a good source of carbohydrates, providing energy for the day.
- Cumin adds a touch of flavor and contains antioxidants.
- Homemade bread is free from preservatives and additives found in some store-bought varieties.
Dietary Information:
- This recipe is vegetarian.
- To make it vegan, ensure that the sugar used is vegan-friendly.
- Can be made dairy-free if served without butter.
Nutritional Facts (per serving, based on 8 servings):
- Calories: 150
- Protein: 4g
- Carbohydrates: 28g
- Dietary Fiber: 1g
- Sugars: 1g
- Fat: 2g
- Saturated Fat: 0g
- Cholesterol: 0mg
- Sodium: 250mg
- Calcium: 10mg
- Iron: 1.5mg
Storage:
- Store the bread in an airtight container at room temperature for up to 2 days.
- To keep the bread longer, refrigerate it and reheat before serving.
- The bread can be frozen for up to 1 month. Thaw at room temperature or in a toaster oven before eating.
Why You’ll Love This Recipe:
- It’s easy and doesn’t require an oven, making it accessible for everyone.
- Fresh, homemade bread always tastes better than store-bought versions.
- The process is simple and satisfying, perfect for beginner bakers.
- The versatility of the recipe allows you to customize it with your favorite flavors and ingredients.
Conclusion: Congratulations on making your own homemade bread without an oven! This simple yet delicious recipe proves that you can enjoy fresh, warm bread anytime, even without a traditional oven. The combination of a soft interior and crispy exterior makes this bread a delight to eat. Whether you enjoy it plain, with butter, or as part of a meal, this homemade creation will become a staple in your kitchen. Happy baking!
10 Frequently Asked Questions:
- Can I use whole wheat flour instead of plain flour?
- Yes, you can substitute whole wheat flour, but you may need to adjust the water content slightly.
- What can I use instead of cumin?
- You can omit the cumin or replace it with other herbs or spices like rosemary, thyme, or garlic powder.
- How do I know if the dough has risen enough?
- The dough should double in size and feel airy and light when touched.
- Can I use active dry yeast instead of instant yeast?
- Yes, but you’ll need to dissolve it in warm water and let it sit until foamy before mixing with the other ingredients.
- What if I don’t have a large enough pan?
- You can split the dough into smaller portions and cook in batches or use multiple pans.
- Can I add seeds or nuts to the dough?
- Yes, adding seeds like sesame or sunflower, or nuts like chopped walnuts, can add extra texture and flavor.
- Is it possible to make this bread gluten-free?
- You can try using a gluten-free flour blend, but the texture may differ slightly.
- How do I store leftover dough?
- You can store leftover dough in the refrigerator for up to 24 hours. Let it come to room temperature before frying.
- Can I use this method to make other types of bread?
- Yes, you can experiment with different herbs, spices, and even cheese to create a variety of pan-fried breads.
- What if the bread is burning on the outside but not cooking inside?
- Lower the heat and cover the pan to allow the bread to cook through without burning.


