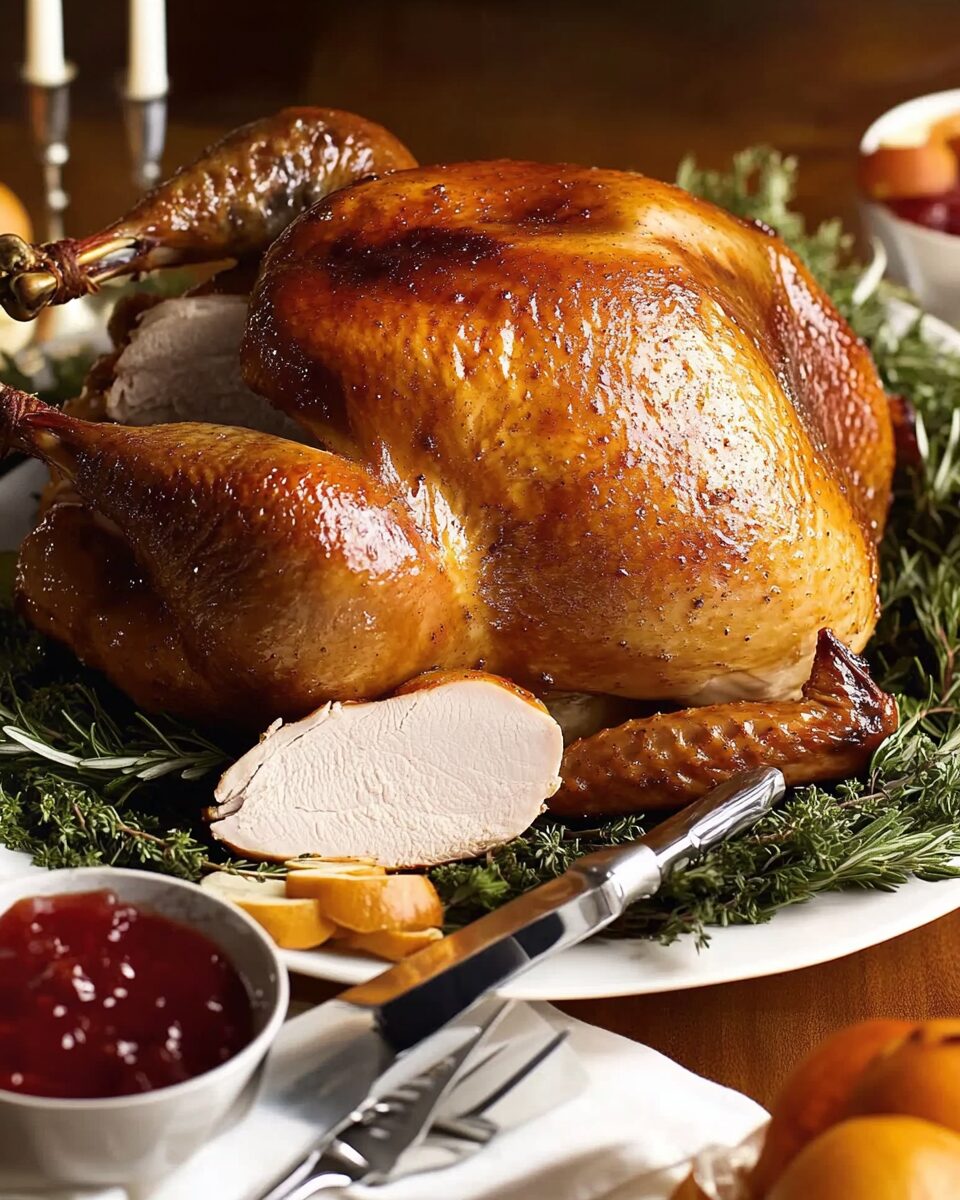
This Juicy Roast Turkey, brined to perfection and basted with garlic herb butter, ensures moist and flavorful meat with crispy, golden skin. The turkey is roasted to a beautiful golden-brown, making it a stunning holiday centerpiece.
Whether you’re hosting a Thanksgiving feast or a Christmas dinner, this simple dry-brine method guarantees that your turkey will be tender and packed with flavor. Pair it with a rich turkey gravy or tangy cranberry sauce for the ultimate festive meal!
Full Recipe:
- 10 lb / 5kg whole turkey, thawed (plain, not pre-brined)
- 2.5 tbsp kosher salt
- 2 tsp dried thyme
- 1 tsp paprika
- 1 tsp garlic powder
- 1/2 tsp black pepper
- 150g / 10 tbsp unsalted butter, melted
- 1 tbsp sage, rosemary, thyme, finely chopped
- 3 garlic cloves, minced
- 2 heads of garlic, halved
- 1 onion, halved
- 2 small bunches of mixed herbs (sage, rosemary, thyme, parsley)
- 1.5 cups dry white wine (or water)
Directions:
- Pat turkey dry with paper towels, inside and out. Remove giblets if present.
- Mix salt, thyme, paprika, garlic powder, and black pepper. Rub the turkey thoroughly with the mixture, focusing on the breast.
- Wrap the turkey in cling wrap and refrigerate for 2 days, flipping the turkey after 1 day.
- Preheat oven to 220°C (425°F). Unwrap the turkey and place it upside down on a rack over a roasting pan.
- Stuff the cavity with herbs, garlic halves, and a bit of butter. Tie the drumsticks together.
- Roast for 30 minutes, then flip the turkey right side up.
- Reduce oven temperature to 165°C (325°F). Brush with melted butter and continue roasting for 45 minutes.
- Baste with remaining garlic-herb butter and roast for an additional 30 minutes or until internal temperature reaches 75°C (165°F).
- Rest the turkey for 30 minutes before carving.
Prep Time: 15 minutes | Cooking Time: 2 hours | Total Time: 2 hours 15 minutes
Kcal: 350 kcal | Servings: 10-12 servings
The Magic Behind a Juicy Roast Turkey: Why Dry Brining is the Key
Roast turkey is a quintessential dish for holiday feasts like Thanksgiving and Christmas, but it can often leave home cooks nervous about the final outcome. Dry meat, especially in the breast area, is one of the most common challenges when preparing a turkey. Thankfully, the method of dry brining has emerged as a game-changer in the kitchen, delivering succulent meat and crispy golden skin with minimal fuss.
What is Dry Brining?
Dry brining involves rubbing the turkey with a salt-based seasoning mix and letting it rest in the refrigerator for one or more days before roasting. This method contrasts with the traditional wet brining process, where the turkey is submerged in a salty water solution. Dry brining is not only easier and less messy but also yields superior results in both flavor and texture.
- Moisture Retention: The salt draws moisture out of the turkey, which dissolves the salt and is then reabsorbed back into the meat, making it more flavorful and moist.
- Flavor Concentration: Unlike wet brining, where the turkey absorbs water along with salt, dry brining allows the bird to retain its natural juices, concentrating the turkey flavor rather than diluting it.
- Better Texture: Dry brining helps break down some of the proteins in the turkey, resulting in a more tender bite.
- Crispy Skin: Since there’s no excess liquid involved, the turkey skin dries out, making it easier to achieve that sought-after crispy, golden-brown finish.
- Easier Gravy Preparation: The pan drippings from a dry-brined turkey aren’t overly salty, which allows you to use them directly for making a flavorful gravy.
Why This Dry Brined Roast Turkey Recipe Stands Out
This recipe has been carefully crafted to ensure that the turkey not only looks stunning but also delivers unbeatable taste and texture. Here’s why this particular dry-brined turkey recipe is worth trying:
- Simplified Brining Process: The dry brine method eliminates the need for a bulky container or bucket to hold the turkey and brining liquid, as required by wet brining. You can simply use your fridge and some cling wrap or a resealable plastic bag, making the process much more practical.
- Enhanced Turkey Flavor: The blend of salt, thyme, garlic powder, paprika, and black pepper enhances the natural turkey flavor without overpowering it. The garlic herb butter applied during the roasting process adds another layer of aromatic richness.
- Faster Cooking Time: Dry-brined turkeys tend to cook faster than non-brined or wet-brined birds, which means you’ll spend less time waiting by the oven. The accelerated cooking process is a huge bonus, especially during hectic holiday meals.
- No Special Equipment Required: This recipe is designed to be accessible for everyone. There’s no need for fancy roasting racks or basters—simple tools and techniques get the job done effectively.
Expert Tips for the Perfect Dry-Brined Turkey
- Start Early: The success of this recipe depends on giving the dry brine time to work its magic. Ideally, you should start the brining process two days before you plan to roast the turkey. This ensures that the salt has ample time to penetrate the meat and deliver the best results.
- Choose the Right Turkey: Always opt for a plain, non-pre-brined turkey. Pre-brined or self-basting turkeys have already been treated with a saline solution, and adding a dry brine on top could make the bird overly salty.
- Adjust for Turkey Size: If you’re working with a turkey larger or smaller than the standard 10-pound bird, adjust the amount of salt accordingly. A general rule of thumb is to use 1 tablespoon of salt for every 2 kg (4 pounds) of turkey.
- Proper Thawing: It’s crucial to thoroughly thaw your turkey before applying the dry brine. You can either thaw the turkey in the refrigerator, which takes about 24 hours for every 4 pounds, or use a faster water-thawing method if you’re short on time. Importantly, the turkey skin needs to be pliable for the salt rub to adhere properly.
- Resting the Turkey: After removing the turkey from the oven, always allow it to rest for at least 30 minutes before carving. This rest period allows the juices to redistribute throughout the meat, ensuring every bite is moist and tender.
- Use a Meat Thermometer: For perfectly cooked turkey, it’s essential to check the internal temperature using a meat thermometer. The recommended internal temperature is 75°C (165°F) when measured between the breast and leg.
Why You Should Roast the Turkey Upside Down (At First)
This recipe includes an unconventional but highly effective technique: starting the roast with the turkey upside down. Here’s why it works:
- Juicier Breast Meat: By placing the turkey breast-side down for the first 30 minutes of cooking, the juices naturally flow into the breast, keeping it moist and tender.
- Even Cooking: This method helps ensure even cooking, as the dark meat of the legs and thighs gets more direct heat, which they need due to their higher fat content. After flipping the bird to finish cooking right side up, the breast gets the perfect amount of exposure to heat, resulting in crispy skin without overcooking the meat.
How to Style and Serve Your Roast Turkey
While the star of the holiday table is often whisked away quickly to be carved, presentation is still an important aspect of the meal. Here are some simple yet elegant styling ideas for your turkey platter:
- Edible Garnishes: Arrange a bed of fresh watercress or other leafy greens around the turkey. Add pops of color with sliced oranges and cranberries for a festive touch that complements the flavors of the meal.
- Herb Sprigs: Garnish the turkey with fresh herb sprigs, such as rosemary, sage, and thyme, to enhance the presentation and tie together the flavors.
- Serve with Cranberry Sauce and Gravy: While it’s tempting to choose between cranberry sauce and gravy, both are essential for a well-rounded meal. The tartness of the cranberry sauce cuts through the richness of the turkey, while the savory gravy adds depth and moisture to each bite.
Perfect Pairings: What to Serve with Roast Turkey
A juicy roast turkey is undoubtedly the centerpiece of any holiday meal, but the sides you serve can elevate the entire dining experience. Here are a few classic and complementary dishes to serve alongside your roast turkey:
- Classic Stuffing: Although this recipe doesn’t involve stuffing the bird, a classic bread stuffing baked separately ensures it’s cooked to perfection. The combination of soft, flavorful bread cubes, herbs, and aromatics is a must-have on the table.
- Mashed Potatoes: Creamy mashed potatoes are the perfect vessel for soaking up the turkey gravy. Whether you prefer them simple or loaded with garlic and butter, they’re a comforting addition to the feast.
- Roasted Vegetables: Caramelized roasted vegetables like carrots, Brussels sprouts, and sweet potatoes are a colorful and nutritious side that adds texture to the meal.
- Cranberry Sauce: The sweet and tangy flavors of homemade cranberry sauce provide a vibrant contrast to the rich, savory turkey.
- Green Bean Casserole: This classic dish, with its creamy sauce and crunchy fried onion topping, adds a comforting element to the meal that pairs beautifully with the turkey.
Conclusion
Roasting the perfect turkey doesn’t have to be a stressful experience. By utilizing the dry brine method, you can guarantee that your bird will be tender, flavorful, and juicy every time. The recipe’s simplicity allows you to focus on other elements of your meal, while still ensuring an impressive turkey that will wow your guests. With its crispy golden skin and succulent meat, this roast turkey is sure to be the highlight of your holiday gathering.
The beauty of this recipe lies in its adaptability. Whether you’re a seasoned cook or a novice in the kitchen, this dry-brined turkey technique is foolproof and delivers consistent results. So, this holiday season, let the dry brine do the hard work, and enjoy a stress-free, delicious turkey feast that everyone will remember for years to come.


